12
2010-Jul
How to Simulate Fractals in Photoshop다음은 프랙탈을 만드는 제작툴을 사용하지 않고 포토샵 기능만을 이용하여 프랙탈 이미지를 만드는 튜토리얼입니다.
영어로 되어 있으나 포토샵 툴을 보시면 이해가 될것입니다.
저도 많은 도움이 되었습니다.
특히 동영상을 보시면 더욱 도움이 되실겁니다.^^
 How to Simulate Fractals in Photoshop
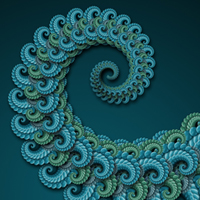
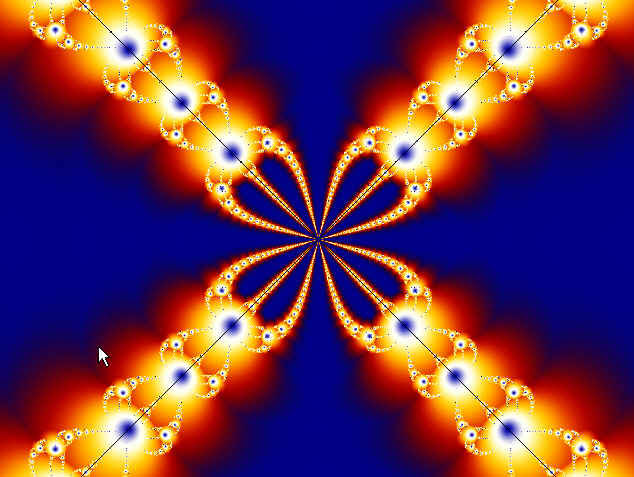
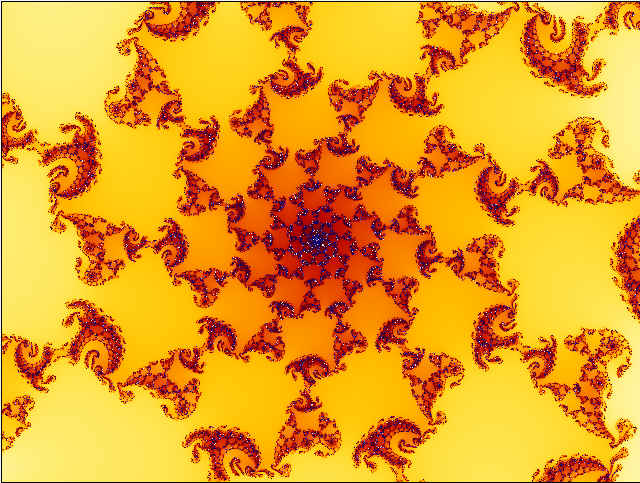
Have you ever seen those outstanding fractal images with a lot of swirls and colors? Some of those were build simulating fractals or repeating shapes, where each shape is a reduced part of the whole, others were build mathematically. In this tutorial, we’ll create a stylized fractal design using only Photoshop.
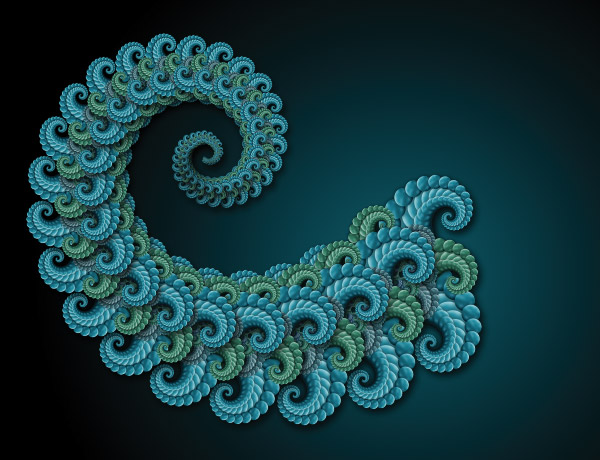
Final Image Preview
Let’s take a look at the image we’ll be creating. Want access to the full PSD files and downloadable copies of every tutorial, including this one? Join Psdtuts+ PLUS for just $9/month. You can view the final image preview below or view a larger version here.

Video Tutorial
Our video editor Gavin Steele has created this series of video tutorials to compliment this text + image tutorial.
Step 1
Wikipedia define fractals as "a rough or fragmented geometric shape that can be split into parts, each of which is (at least approximately) a reduced-size copy of the whole." There are many ways to create fractals, most involve complex mathematical formulas, or fractal software programs, like Apohpysis for example, but with our good old Photoshop we can simulate the fractals behavior using repeating shapes and some useful keyboard shortcuts.
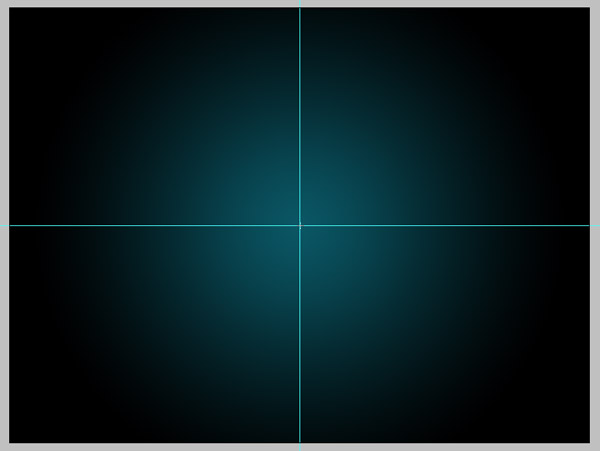
So, let’s get it started. First we’ll start with a 1600 pixels by 1200 pixels document, it’s huge because I’m planning to use it as a desktop background. Then, show the ruler (Command + R) and change the unit to Percent. Now, draw two guides, one horizontal and the other vertical, and place them in the middle of the document. Next, using the Gradient Fill Tool, draw a radial gradient (#095261 – #000000), which should look similar to the image below.
Step 2
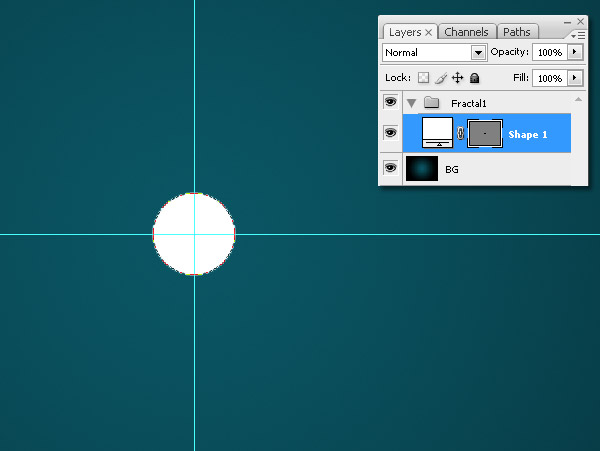
Now here’s the only shape you’ll draw: a circle, yes I’m not kidding, everything starts from a single circle. Draw it using the Ellipse Tool, hold the Shift key to create a perfect circle, and if you want hold the Alt key to draw it from the center. The circle size is 83 pixels by 83 pixels and it’s located in the middle of the document. Now, create a new folder named "Fractal" and place the circle shape inside of it.
Step 3
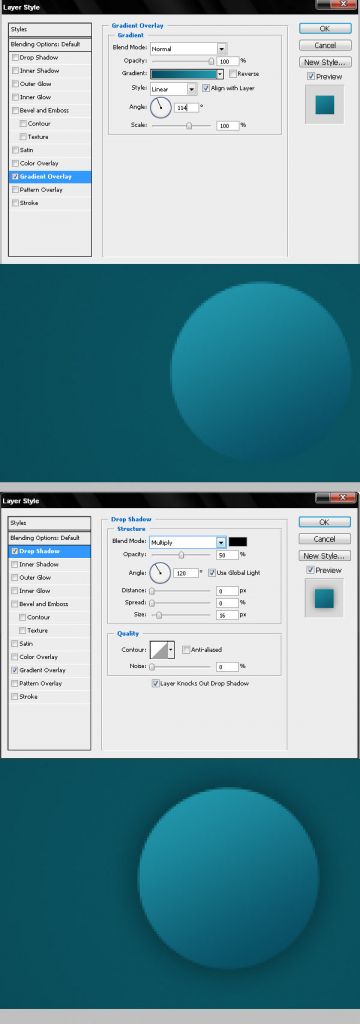
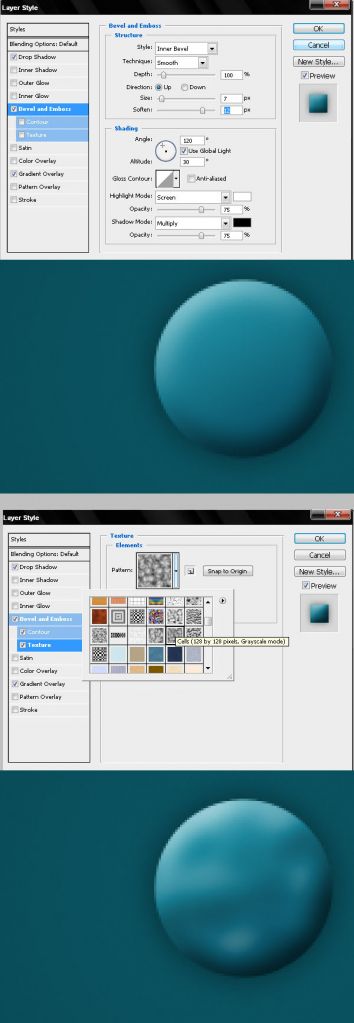
Let’s add some depth and volume to our shape. First, apply a Gradient Overlay that goes from dark blue to light blue, with a Drop Shadow, 50% Opacity, and a 0px distance, some Bevel and Emboss, including a texture. Just follow the images below.
Step 4
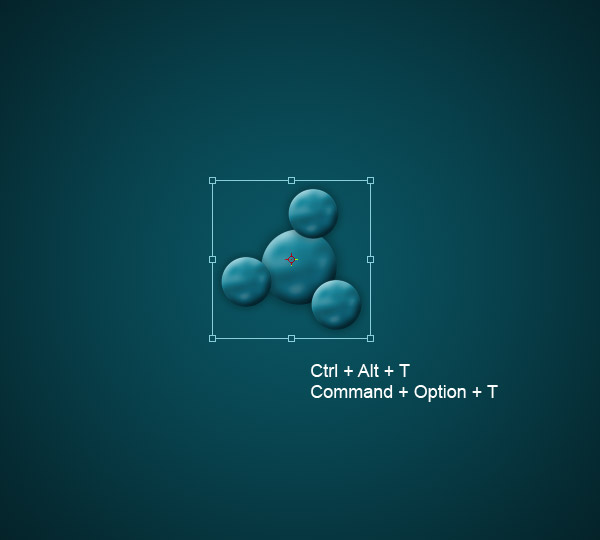
Now duplicate the circle layer by dragging the shape while pressing the Alt key, then merge the circle copy with a new blank layer to keep the style proportional. Resize the copy a little bit and place it 120 degrees from the middle of the document, you can use a triangle as a guide (I drew the triangle using the Polygon Tool).
Place the copy just over one of it’s corners. Repeat this twice to get three small circles around the big circle. Delete the triangle and finally merge the four circles into a new layer called "Fractal 1" (If you want leave a copy of the original vector shape just in case).

Step 5
Here comes the fun part, we’re going to repeat two steps several times. This is the first one, we’ll Duplicate and then Free Transform. To get the right effect we need to use the shortcut Command + Alt + T. This command duplicates the existing image and allows to free transform the copy. Do not click anywhere and go to next step.
Step 6
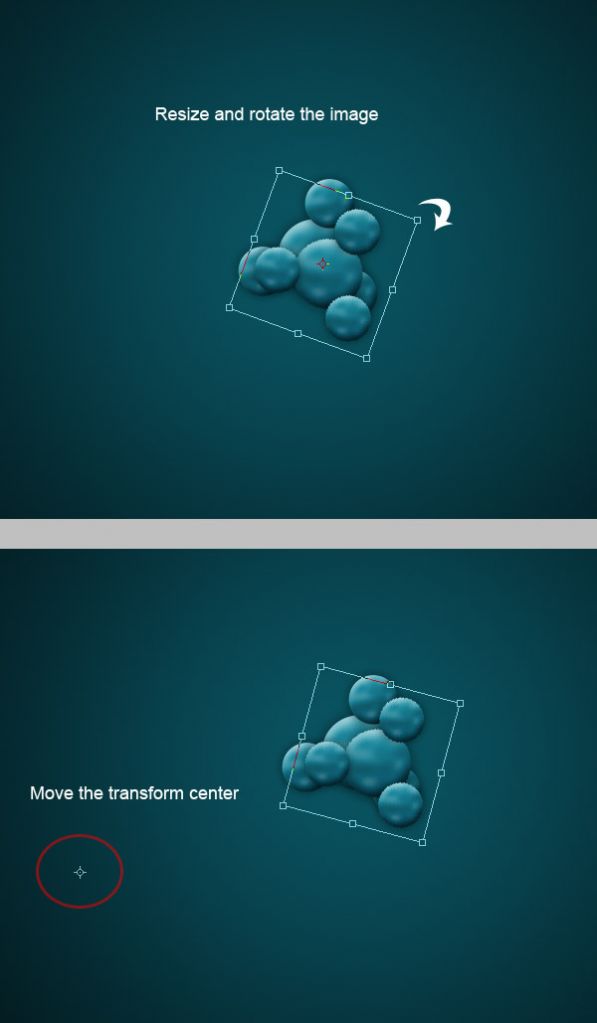
While holding the Shift key, resize the "Fractal 1 copy" just a little bit, then rotate the copy a few degrees Clockwise. The trick to simulate the fractals is move the Transform center to the left, right, top, or bottom, depending on your needs. This time we’ll move it a lot left. Finally, hit Enter.
Step 7
Now we’re going to use another useful keyboard shortcut. Press Command + Shift + Alt + T to apply Free Transform again once and see the result. What happened? Photoshop takes the previous values of the Free Transform and apply them to the new object. If you repeat this command several times you’ll get a nice fractal swirl. Photoshop creates a new layer each time you apply this command.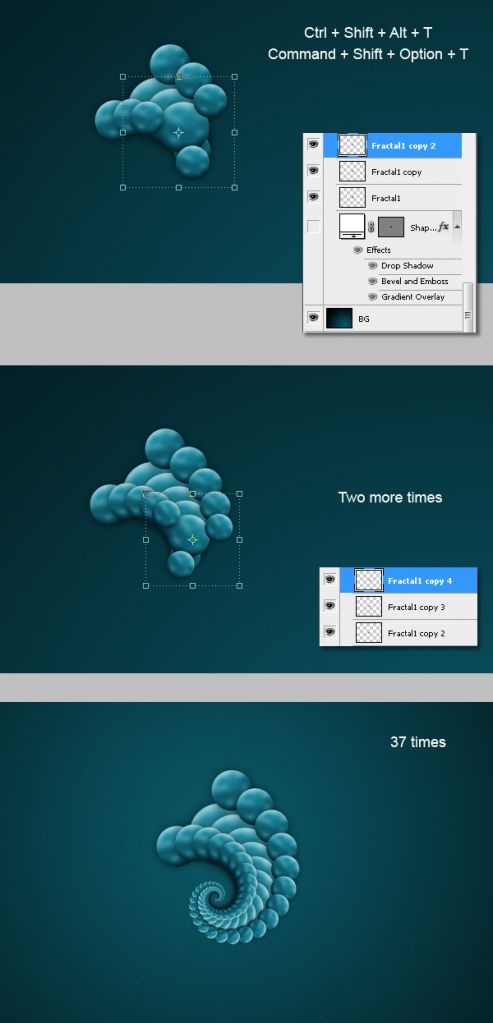
Step 8
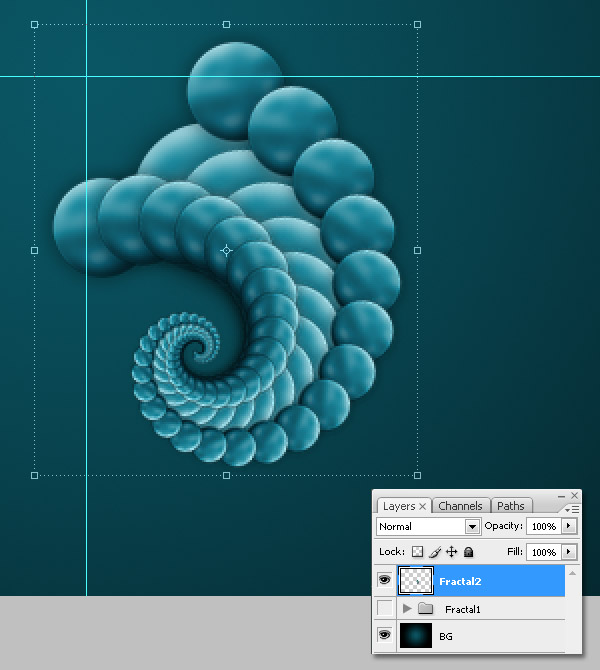
Now, duplicate the entire "Fractal 1" folder, then select the "Fractal 1 copy" folder and hit Command E to merge the group. Now name the resulting layer "Fractal 2", then hide the original folder. Also, move the "Fractal 2" layer some pixels down and to the right from the middle of the document.
Step 9
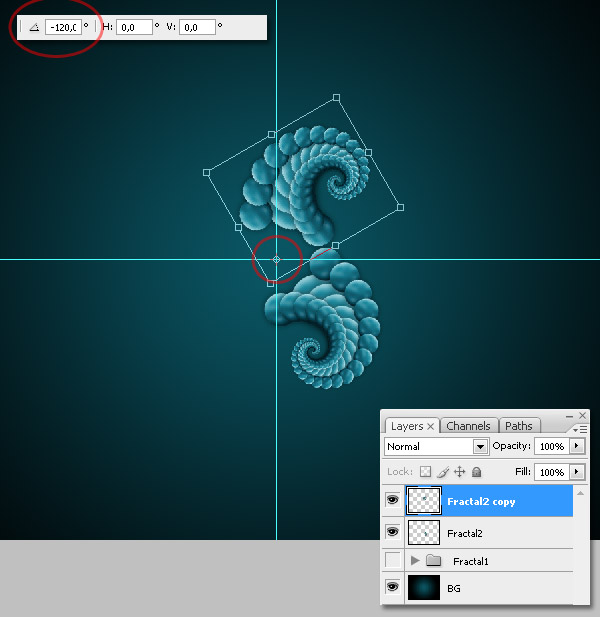
Select the "Fractal 2" layer, then apply the Duplicate and Free Transform keyboard shortcut from Step 5 (Command + Alt + T), though change the transformation center to the middle of the document and rotate the image -120 degrees CCW.
Step 10
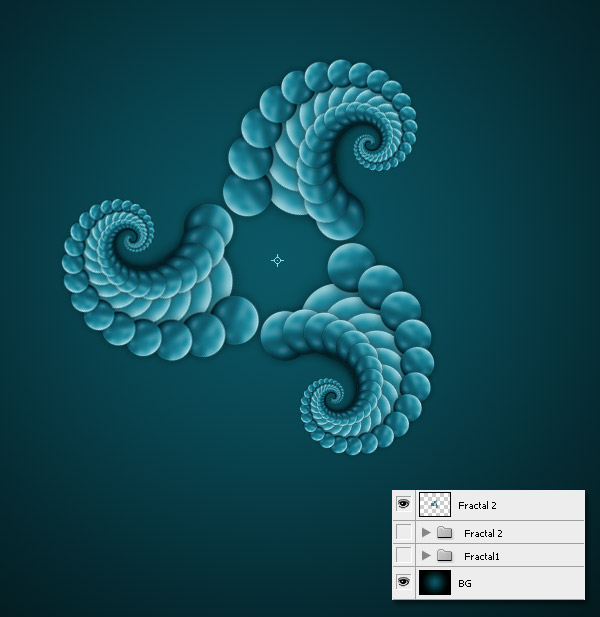
Now hit the Free Transform again keyboard shortcut from Step 7 (Command + Shift + Alt + T), doing this you’ll duplicate the 120 degrees rotate transformation exactly. Finally, put the three layers into a new folder named "Fractal 2," Now, duplicate the folder and merge the copy, hide the original folder, and name the merged copy "Fractal 2."
Step 11
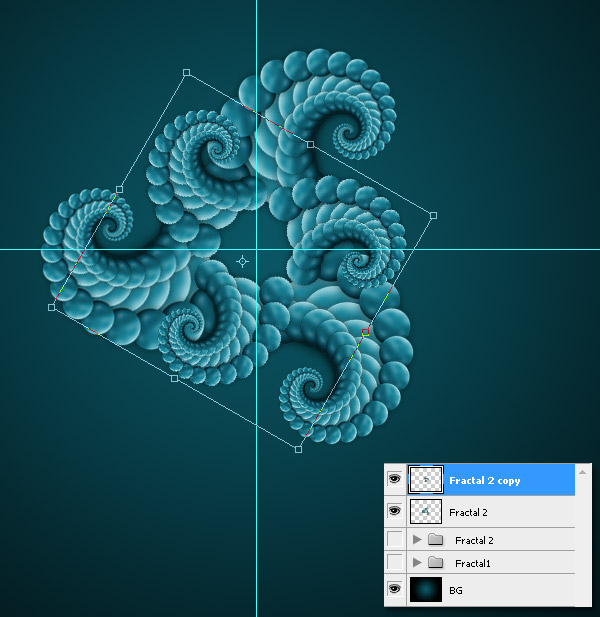
Duplicate and Free Transform (Command + Alt + T) the "Fractal 2" layer, keep the transformation center where it is, then while holding Shift + Alt keys, resize and rotate the copy just a little bit. Try to get something like the image below.
Step 12
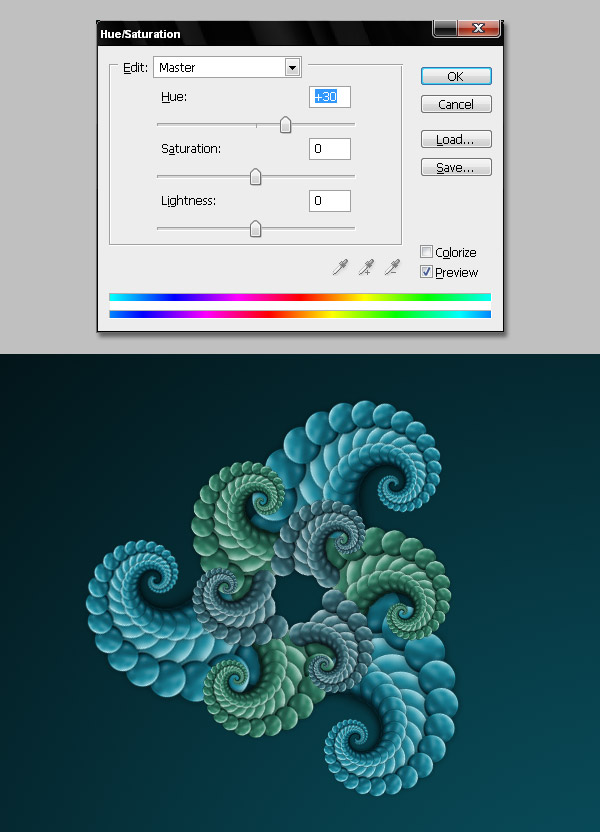
Change the "Fractal 2 copy" layer Hue/Saturation, use the values shown below. We’ll make this one a little bit green.

Step 13
Free Transform again the layer and adjust Hue / Saturation using these values.
Step 14
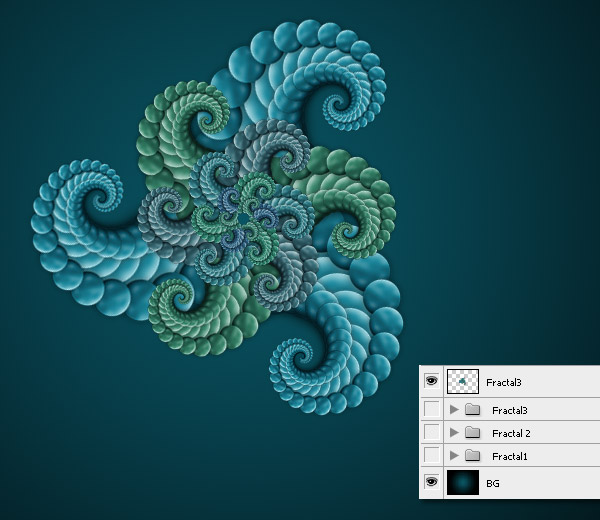
Repeat the Free Transform again command (Command + Shift + Alt + T) as many times as you want, but always change the Hue and Saturation to get one green layer above a blue one. When you have finished, group all the layers into a new folder called "Fractal 3." Next, duplicate the folder and merge the copy, just like in the previous steps. Name the copy "Fractal 3."
Step 15
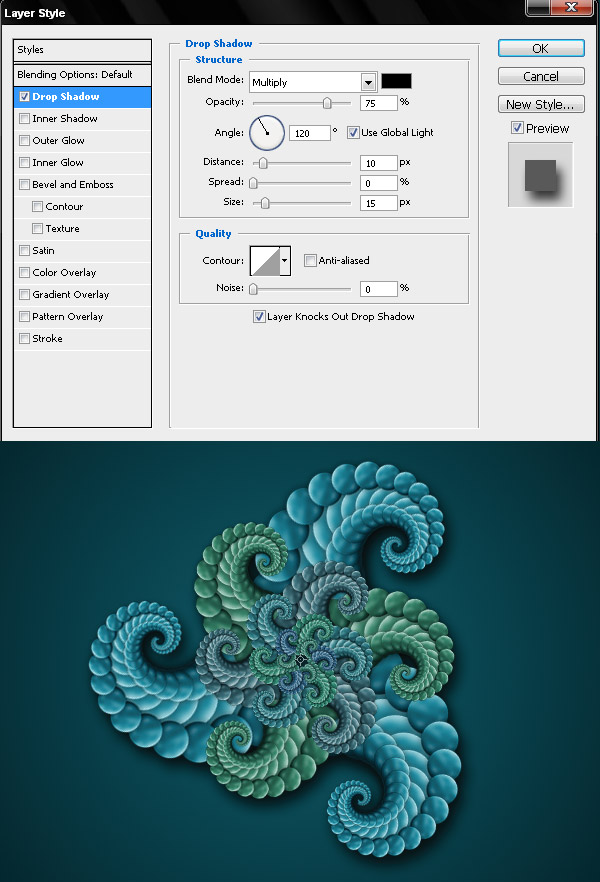
Add a dark Drop Shadow to the "Fractal 3" layer.
Step 16
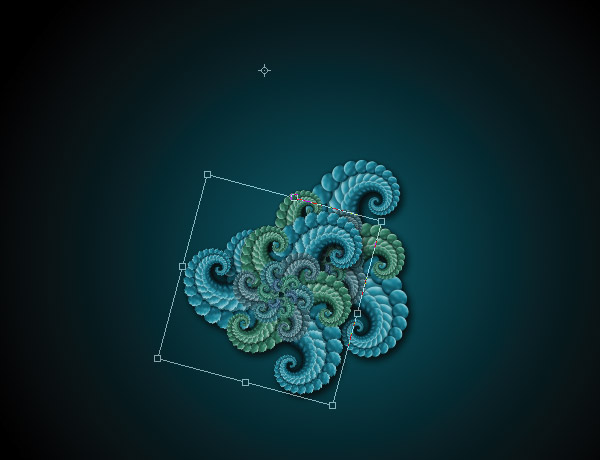
Duplicate and Free Transform (Command + Alt + T) the "Fractal 3" layer, rotate the copy a few degrees CW, resize it a little bit making the copy smaller, and change the transformation center to the top-left, then hit Enter.
Step 17
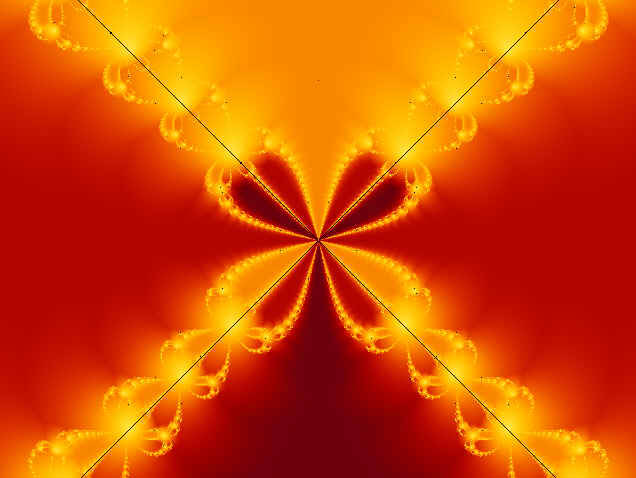
Free Transform again (Command + Shift + Alt + T) a lot of times to get something like this. You can repeat these steps as many times as you want, but I’ll stop the design right here.
Conclusion
As you can see, you can apply this technique to create a lot of abstract designs, or mixing the fractal shapes with real images to improve your outcome. It’s up to you from here. Good luck! You can view the final image below or view a larger version here.
Subscribe to the Psdtuts+ RSS Feed for the best Photoshop tuts and articles on the web.
Browsing AuthorAlvaro Guzman

출처 : http://psd.tutsplus.com/tutorials/tutorials-effects/how-to-simulate-fractals-in-photoshop/
23
2010-May
프랙탈 아트 작품 만들기 -1프랙탈아트에 관하여 질문을 최근 많은 곳에서 받고 있어 프랙탈 작품에 관하여 궁금해 하는 분들을 위해 시간이 날때마다 조금씩 방법을 만들어 올리고자 합니다.^^ 자주는 못할 수 있도록 노력해볼게요..^^
첫번째로 프랙탈작품으로 많은 분들이 질문하는 갈대 작품에 대하여 방법을 올리도록 하겠습니다.
프랙탈은 우연이라는 바탕을 두고 있습니다. 해프닝의 한줄기라고 해도.. 무방하지 않을까? 생각됩니다.
Fractal Reed-2 작품을 만들기 위해 아래의 그림과 같이 6개의 프랙탈 이미지가 쓰여 졌습니다..
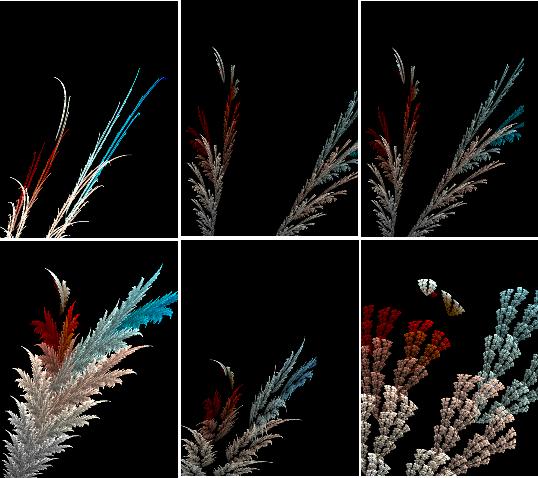
<그림1. 갈대를 만들기 위해 각각 만들어진 다양한 프랙탈 이미지들>
프랙탈을 가지고 형태를 만들기 위해서는 위와 같이 여러장의 프랙탈 이미지들이 필요하며 이것을 아래 그림과 같이
포토샵에서 레이어로 올려서 완성된 이미지를 만들어 낸다.
물론 여기서 reed(갈대)를 만들기 위해서 기본적인 구상은 필요하겠지만 프랙탈 작업을 할때 바로
갈대 요소를 만들수 있는 것은 아니다.. 아무튼 이런 우연적인 또는 해프닝 적인 부분은 이곳에서 언급은 하지 않겠다.
<그림2. 포토샵 레이어의 모습니다.>
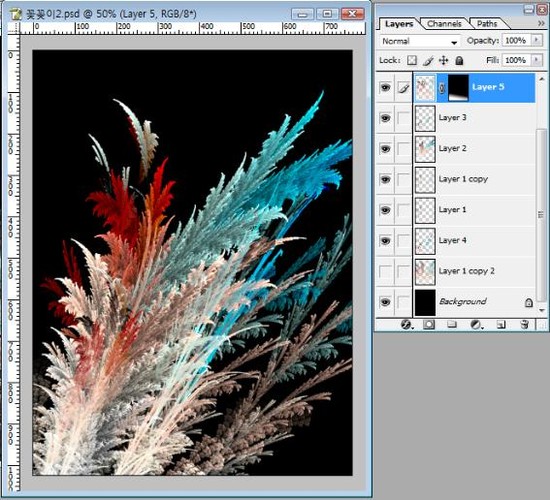
[그림2]와 같이 여러개의 프랙탈 이미지들을 가지고 하나의 새로운 형태를 만들었습니다.
필자가 만든 대부분의 프랙탈 아트 작품들이 이런 과정을 통해서 만들어졌습니다.
위에 [그림2]의 소스를 첨부로 올리니 다운 받아서 확인해 보기 바랍니다.
[그림2]를 포토샵에서 확인하면 총 8개 레이어로 되어 있습니다.
최종결과물 : 첨부파일 reed-2.zip 파일을 다운받아 보기시 바랍니다.
---------------------------------------------------------------------------------------------
아래 ↓ 첨부파일중 zip 을 다운받아 보시기바랍니다.
Facebook 댓글
03
2009-Nov
울트라프랙탈4.03 사용설명서(ultra Fractal Manual) -no1프랙탈 이미지 제작툴 중의 하나인 울트라프랙탈(Ultra Fractal)4.03 버전의 한글 설명서를 올립니다.
툴 설명위주라서 툴을 다루는데 도움이 되었으면 합니다.
앞으로 울트라 프랙탈 및 아포피시스 와 KPT Fractal도 사용법을 올릴 예정입니다.
“Ultra Fractal 4.03 Animation” Version 사용 법
1. 아래의 그림은 울트라프랙탈(이하 UF4.03)4.03 버전의 초기 화면입니다.
uf4.03버전을 사용하지만 작품을 만드는데는 큰 무리는 없습니다. 물론 5.x 버전을 구한다면 더욱 좋겠지오.
울트라 프랙탈은 판매을 하고 있으므로 구입을 하여 사용하셔야됩니다.
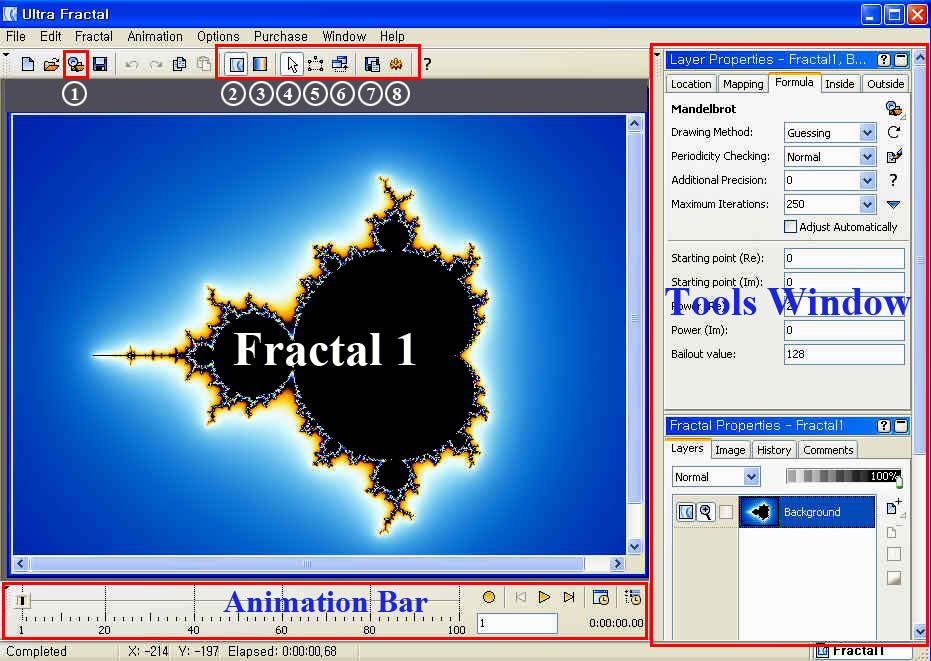
▶ 초기화면
작업 창 중앙에 Default “Fractal 1”이 자동으로 Open이 된다.
우측에는 Fractal 편집을 위한 각종 도구 창들이 탭 형태로 정렬되어 있다.
좌측 하단에는 Animation Bar가 있고, 이 도구 창들은 Fractal Image 편집을 위한 정보 패널이며 항상 열려 있어야 한다.
▶ 상단의 주요 도구설명
① Browse: ”Select Fractal Formula” 창 열기
② Fractal: Fractal Image 편집 창(Default)
③ Gradient: Gradient Color 편집 창
④ Normal Mode: Fractal 창의 크기, 위치, 각도 등 조절
⑤ Select Mode: 선택 영역의 크기, 위치, 각도 등 조절
⑥ Switch Mode: Fractal Type 전환
⑦ Save Parameters: 작업 정보를 Text로 저장(용량최소)
⑧ Render to Disk: 완성된 Fractal Image, Fractal Movie 출력
2. 나의 첫 Fractal Image 만들기
자 그럼 UF를 이용하여 간단한 이미지를 만들어 보도록 하겠습니다.
① (초기 화면의 Image 닫기)
나의 첫 Fractal Image를 만들기 위해서 초기 화면의 Fractal 1 Image를 닫기로 한다.
<File- Close>
② (Fractal Formula 선택하기)
<File- New- Fractal> 선택
다음과 같은 “Select Fractal Formula” 창이 열린다.
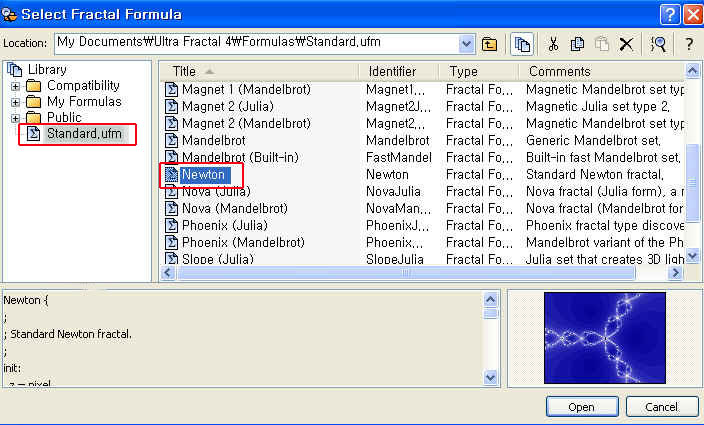
좌측 “Standard.ufm” File 클릭- 우측 Fractal Formula 목록 중에서 “Newton” 선택- Open 클릭
# 참고: Formula는 미리 맞추어 놓은 샘플 Fractal , 즉 하나의 기본 형(基本 型) 이다.
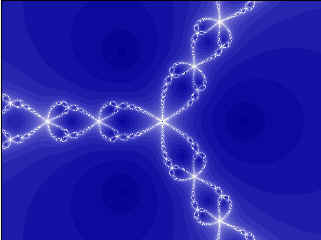
Fractal Formula 중에서 하나를 선택하면 아래의 “미리 보기 창”에서 그 Image를 미리 볼 수 있다
③ (Formula 변수를 바꾸어 Image 변형하기)
우측 도구 창 상단 “Layer Properties”창에서 “Formula” tab 클릭
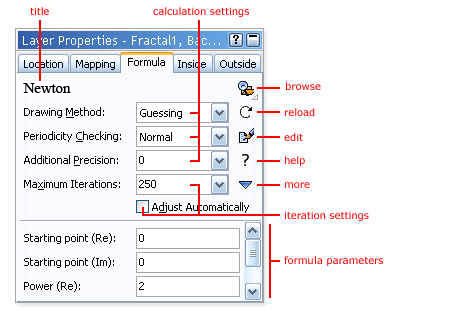
# 참고: 이 “Formula” tab은 ”Newton” Formula의 아래와 같은 4개의 변수 설정 값을 보여 준다.
Drawing Method=도화 방식
Periodicity Checking=주기율점검
Additional Precision=추가 정밀도
Maximum Iterations=최대 반복
그리고 그 아래에는 좀 더 구체적인 변수 설정 값을 표시해 준다.
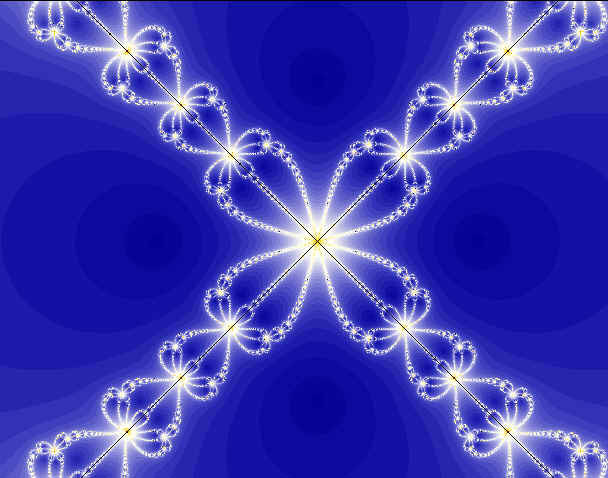
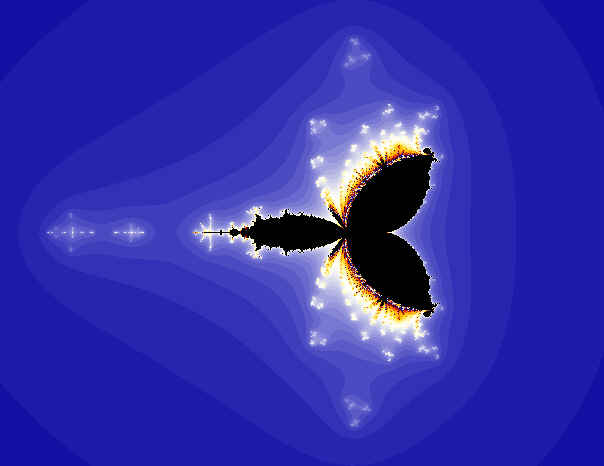
Exponent 변수는 이 “Newton” Formula 구조의 가지(arms) 수량을 뜻한다.(초기 값은 3).
Exponent(Re) 값을 4로 하면 다음과 같은 모양으로 될 것이다.
④ (Fractal 창의 크기 조절하기)
Fractal Properties 도구 창의 “Image” tab 클릭- 원하는 가로(Width)와 세로(Height) 값 입력한다.
#참고: “Maintain Aspect Ratio” 체크하면 가로, 세로 비율 고정
⑤ (색상 연산 적용하기)
Layer Properties 도구 창의 “Outside” tab 클릭- “Outside” tab의 “Browse” Button 클릭 (“Select Outside Coloring Algorithm” 창이 열린다.)
좌측의 “Standard.ucl” File 클릭- 우측의 “Orbit Traps” 클릭-Open 클릭
Transfer Function 설정 값 우측의 화살표 클릭
- 메뉴에서 “Log” 선택
- 계속해서 “Trap Shape” 변수 값 우측의 화살표 클릭
- 메뉴에서 “Egg” 선택
-그 결과는 다음과 같은 Image로 될 것이다.
# 참고: “Outside Coloring” tab에서는 다음과 같은 변수 값을 조절할 수 있다.
Color Density= 색상 농도
Transfer Function= 색상 전환 함수
Solid Color= 단일 색상
Gradient Offset= Gradient의 단층
Repeat Gradient= gradient의 반복
⑥ (Fractal Image의 검은 색 선 없애기)
Layer Properties 도구 창의 “Location” tab 클릭- Rotation Angle 값에 .01 입력
# 참고: Fractal arms(가지)에 생기는 검은 색 선은 정밀 연산작용에 의한 것 이다.
⑦ (지금까지의 작업 결과를 저장하기)
#Text File로 저장하기(용량이 가장 적다)
File- Save Parameters 선택(“Save Parameter Set” 창 열린다)
하단의 File Name 에 추가로 tutorials.upr 을 입력한다
(File경로:\My Document\Ultra Fractal4\Parameters\tutorials.ur)
Title에는 “Newton1” 이라고 입력하고- Save 클릭.
#Fractal Image로 저장하기
File- Save 선택
File 이름= Newton 1.
Folder 이름= Fractal
⑧ (저장한 Fractal 불러오기)
File- Browse 선택 (또는 Tool Bar의 ”Browse” Button 클릭 )
좌측의 tutorials.upr 클릭- 우측의 Newton1 선택- 더블클릭
# Fractal Image를 불러올 경우는 File- Open 선택
⑨ (마우스 조작으로 Fractal Image 변형하기)
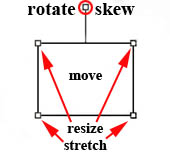
#Normal Mode에서 Image 변형하기
Fractal 메뉴- Normal Mode 선택 (Default는 Normal Mode)
또는 Tool Bar의 “Normal Mode” Button 클릭
![]()
크기 조절: Fractal Image 창을 Shift+클릭 Drag
이동: Fractal Image 창을 Ctrl+클릭 Drag
회전: Fractal Image 창을 Alt+클릭 Drag
확장: Fractal Image 창을 Shift Ctrl+클릭 Drag
왜곡: Fractal Image 창을 Ctrl Alt+클릭 Drag
#조절 끝내고 마우스 놓으면 그대로 적용
#Select Mode에서 선택 영역 변형하기
Fractal 메뉴- Select Mode 선택
또는 Tool Bar의 “Select Mode” 클릭
![]()
Image창에 아래와 같은 4각 선택 영역(Select Box)이 표시된다.
선택 영역 이동= 4각형 선택 영역 내부 클릭 Drag
선택 영역 조절= 4각형 변 또는 조절 점 클릭 Drag
선택 영역 회전= 꼭지 점 클릭 Drag
선택 영역 확장= Ctrl+변 또는 조절 점 클릭 Drag
선택 영역 왜곡= Ctrl+꼭지 점 클릭 Drag
취소= 선택 영역 외부 클릭
# 조절 끝내고 Enter Key 누르면 그대로 적용
3. 몇 가지 기본 기술 익히기
이번에는 다른 Fractal Formula를 불러와서 Switch Mode, Explore, Gradient 편집 등의 기본 기술을 연습하기로 한다.
①.(새로운 Fractal Formula 선택, 불러오기)
File- New- Fractal 선택 (“Select Fractal Formula”창 열림)
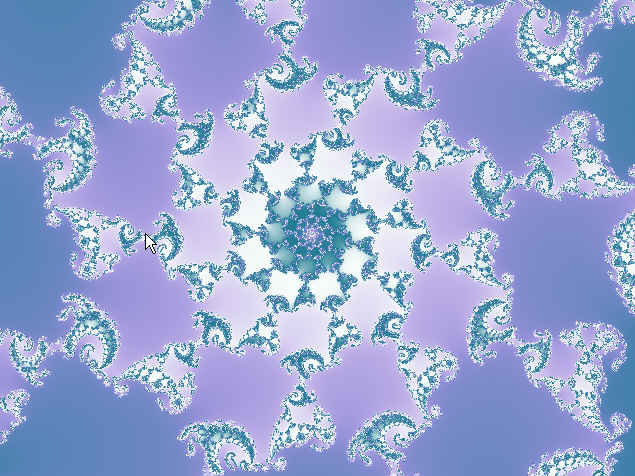
오른쪽 Formula 중에서 “Phoenix(Mandelbrot)” 선택- Open 클릭
#참고: 이름 “Phoenix”를 더블클릭 해도 열린다.
Formula 목록이 표시되지 않으면 왼쪽 “Standard.ufm”클릭
② (Switch Mode 사용하기)
Fractal 메뉴- Switch Mode 선택.
또는 Tool Bar의 “Switch Mode” Button 클릭
![]()
(그러면 우측 “Fractal Mode” 도구 창에 “미리 보기’ 표시).
③ Fractal Image창에서 마우스를 이리 저리 움직이면 오른쪽 “Fractal Mode” 도구 창의 “미리 보기”에 Image 변화가 표시된다.
④ 마우스를 움직이다가 Image가 만족스러우면 그 곳을 클릭 한다.
그러면 “Fractal 2”라는 이름의 또 하나의 Image 창이 만들어 진다.
앞서 만든 “Fractal 1”의 Image 창을 닫는다.
#참고: 여기서 Switch(변환)의 개념을 이해하는 것이 중요하다.
“Mandelbrot Set” 와 “Julia Set”는 Fractal Type에서 가장 기본적 인 형태이다.
“Fractal 1”은 Phoenix(Mandelbrot) Image 이고 “Fractal 2”는 Phoenix(Julia) Image이다.
말하자면 Mandelbrot Type에서 Julia Type으로 Fractal Type이 변환(Switch) 된 것이다.
오른쪽 Layer Properties 도구 창의 “Formula” tab을 클릭 해보면
새로운 “Fractal 2”는 “Julia Seed” 등의 변수 연산방식을 적용하고 있음을 확인할 수 있다.
“Phoenix(Mandelbrot)” Type을 “Phoenix(Julia)” Type으로 Switch 할 때 “Julia Seed” 변수 값을 가져 온 것이다.
Switch Mode는 재미있고 다양한 Fractal 구조를 찾는 방법이다.
⑤ (Explore Tool 사용하기)
Layer Properties 도구창의 “Formula” tab의 변수 입력란 클릭- 그러면 그 아래 칸에 두 개의 아이콘이 나타난다.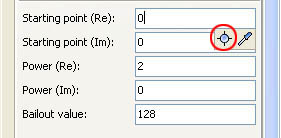
⑥ 위 두 아이콘 중에서 왼쪽의 “Explore” Button 클릭- 그러면 다음과 같은 4각형 격자(Grid) 좌표가 있는 “Explore” 창이 열린다.
(또는 오른쪽 마우스 클릭- Explore 선택해도 “Explore” 창 열림)
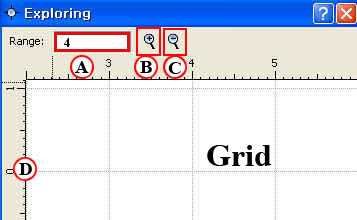
#설명: A= Grid(네모 칸)의 수를 설정할 수 있다(현재는 4)
B= Zoom in (Grid 확대 Button)
C= Zoom out (Grid 축소 Button)
D= Ruler(눈금 자: 마우스로 Drag하면 Grid 이동)
⑦ 4각형 Grid 좌표 위에 마우스를 놓고 이리저리 Drag하면서 오른쪽 도구 창의 미리 보기를 살펴보면
마우스의 위치(좌표)에 따라 Image 형태가 달라지는 것을 볼 수 있다.
그 중에서 마음에 드는 모양이 형성될 때 클릭 하면 별도의 “Fractal 2” 창이 만들어진다.
#참고1: 과거에는 변수 값이 어떤 형태의 변화를 가져오는지 예상하기 어려웠기 때문에 대개의 경우 무작위 선택 방식을 취하였다.
이 문제를 해결한 것이 Ultra Fractal 4 Version에서 도입된 이른바 “Explore” Tool 이다.
#참고2: 위 두 아이콘 중에서 오른쪽의 Eyedropper Tool을 클릭 (또는 오른쪽 마우스 클릭하고 Eyedropper Tool을 선택)하고
Fractal Image 위를 Drag 하면 또 다른 모양을 탐색할 수 있다.
#참고3: 작업을 취소하려면 “Undo” Button을 클릭 한다.
⑧ (Help 메뉴의 Tutorials에서 예제로 만든 Fractal Image와 똑 같은 변수 값을 “복사/붙이기 하기)
# Help 메뉴- Tutorials- Synchronizing the Julia Seed 항에 있는 아래와 같은 Seed 값을 클릭 한다(Clipboard에 복사된다)
-0.2589852008
-0.1395348837
# 다시 Fractal 작업 창으로 돌아 와서 “Layer Properties” 도구 창 “Formula” tab의 “Julia Seed” 변수 입력란을 우측 마우스 클릭하고
메뉴에서 “Paste Complex Value” 선택
그 결과 Fractal Image는 다음과 같이 될 것이다.
# 위와 같은 방식으로 또 하나의 Tutorials 예제의 Fractal 변수 값을 복사/붙이기 하기로 한다.
Help 메뉴- Tutorials- “Synchronizing the Location” 항의 아래와 같은 Location 값을 클릭 한다(Clipboard에 복사된다)
BackgroundLocation{
Location:
Center=-0.3979/0.28282magn=1102.9412
# 다시 Fractal 작업 창으로 돌아 와서 “Layer Properties” 도구 창의 “Location” tab 의 “Paste Location” Button 클릭
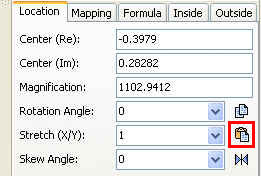
그러면 Fractal Image는 아래와 같이 바뀐다.
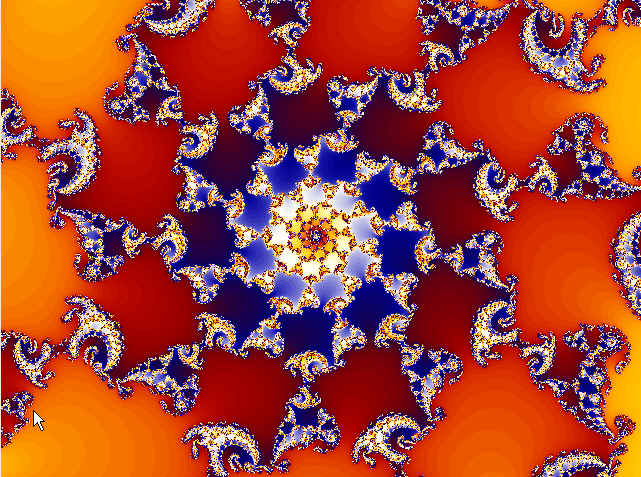
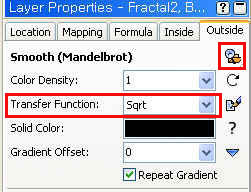
⑨ (Outside Coloring 적용하기)
“Layer properties” 도구 창의 “Outside” tab을 클릭하고- “Browse” Button 클릭
⑩ (“Select Outside Coloring Algorithm”창이 열리면)
오른쪽 목록에서 “Smooth(Mandelbrot)” 선택- Open 클릭
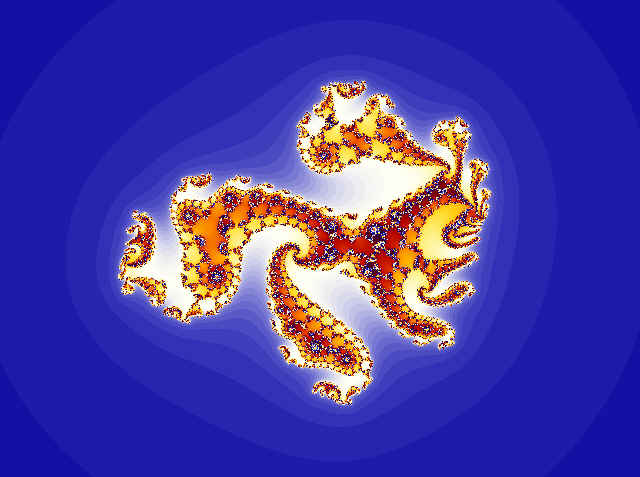
아래와 같이 Image가 변화된다. 좀더 수정할 필요가 있다.
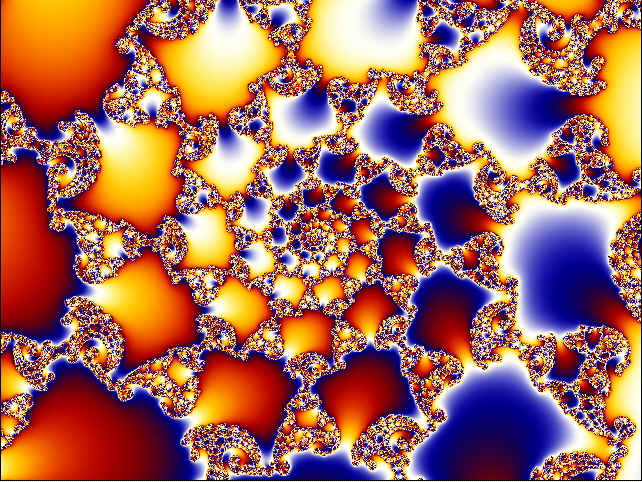
Transfer Function 메뉴에서 “Sqrt” 선택(위 Outside tab 참고)
그 결과 Image가 아래와 같이 수정되었다.
다시 Color Density 값을 5로 입력한다.
그 결과 Image는 아래와 같이 달라진다.

# 지금까지 작업한 Fractal Image를 아래와 같이 저장한다.
File- Save 선택
File 이름= Phoenix 1
Folder 이름= Fractal
⑪ (Gradient 편집 창 다루기)
Fractal 메뉴- Gradient 선택(또는 Tool Bar의 Gradient Button 클릭)
![]()
# 참고: 이미 열려 있는 Fractal Image에 Gradient를 적용할 때는
위와 같이 Gradient 편집 창을 열지만, 처음 새로 작업을 시작할 때는,
File-New를 선택한 다음에
Fractal메뉴-Gradient를 클릭 한다.
그러면 Gradient 편집 창이 열린다.
#참고1: 처음에는 Red, Green, Blue의 3 개 Gradient Bar가 있는 작은 창이 열린다.
아래의 Gradient 편집 창은 Hue (색도), Saturation (채도), Luminance (명도)의 3 개 Bar 등 전체를 펼쳐 놓은 창 이다.
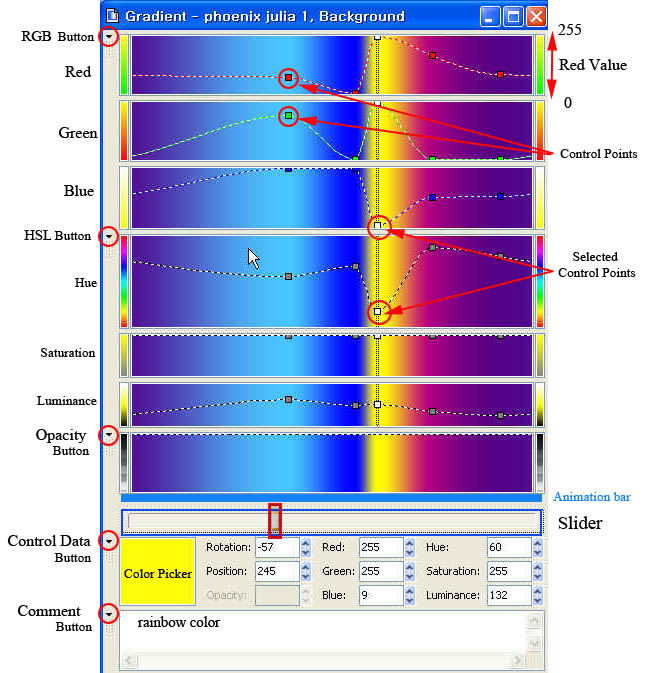
# Gradient 편집 창의 구조:
Gradient 편집 창은 다음 5 개의 구조로 되어 있고 좌측 변의 작은 3각형 Button을 클릭해서 창을 접고 펼 수 있다.
RGB (Red/Green/Blue) 색 판
HSL (Hue/Saturation/Luminance) 색 판
Opacity (불투명도) 색 판
Control (색상 값을 직접 입력)
Comment ( 설명 Text 입력)
Slider 바로 위에는 Animation Bar가 있으나 평소에는 비어있다
# Gradient 편집 작업 요령:
① Gradient 편집은 다음 3가지 방식으로 진행한다.
Control Points를 상/하/좌/우로 Drag
Slider를 좌우로 Drag 아래 Control Data 창에 색상 값을 입력(정밀 작업).
② RGB 색 판을 사용하거나, HSL 색 판을 사용하거나 결과는 같다.
③ 색상과 위치를 조절하기 전에 먼저 Control Points를 클릭 한다
Shift Key를 사용하면 복수의 Control Points를 선택할 수 있다.
④ Control Points의 선택 해제는 색상 판의 빈 공간을 클릭한다.
⑤ 색상 또는 위치 중에서 하나만 조절하려면 Shift+Drag
⑥ 색상의 투명도 조절은 Opacity 색 판에서 한다.
상단 Opacity 값 = 100 하단 Opacity 값 = 0
⑦ Gradient 메뉴의 “Link Color and Opacity”를 선택하면 색상 조절과 불투명도 조절을 결합해서 동시에 할 수 있어 유리하다.
# Gradient 편집 도구 사용 법:
Gradient 편집 창이 열리면 Tool Bar도 Gradient 도구로 바뀐다.

① Insert= 이것을 클릭- 색 판을 클릭하면 Control Point 추가
② Delete= 클릭하면 선택된 Control Point 삭제
③ Link Color and Opacity= 색상과 투명도를 한꺼번에 조절
④ Smooth=선택된 두 Control Point 사이의 색상 변화가 Smooth하게 된다.(그래프 선이 곡선으로 된다)
⑤ Select Color=클릭하고 색상 판 Color를 선택, 적용할 수 있다
⑥ Randomize Color=클릭하면 선택된 Control Point에 무작위 색상 값을 선택, 적용할 수 있다
⑦ Eyedropper= Image 창에서(또는 Gradient 색 판에서) 색상을 채취해서 그것을 선택된 Control Point에 적용할 수 있다
⑧ Copy= Gradient 편집 창의 색상 정보를 복사
⑨ Paste=선택된 다른 Image 창 또는 다른 Layer에 붙이기
#이상의 명령들은 Edit 메뉴에서도 선택할 수 있다
특히 ⑥ Randomize Color의 경우 다음 3 개의 Option을 추가 선택 할 수 있다.
Gradient 메뉴_ Randomize Bright (F6 반복 사용 가능)
Randomize Misty (F7 반복 사용 가능)
Randomize Custom (F8 반복 사용 가능)
⑫ (Help 메뉴 Tutorials 예제의 Gradient 정보를 복사/붙이기 하기)
먼저 File- Open 하고 앞서 저장한 “Phoenix 1”을 불러온다.
⑬ Help 메뉴- Tutorials- Synchronizing colors and Saving the image 항에 있는 아래와 같은 Gradient 정보를 클릭 한다(Clipboard에 복사된다)
Gradient-Fractal2 Background{
Gradient:
Title=”Gradient-Fractal2, Background” smooth=yes
Rotation=155 index=84
Color=13799050 index=247 color=16448758 index=332
Color=9665827
Opacity:
Smooth=yes
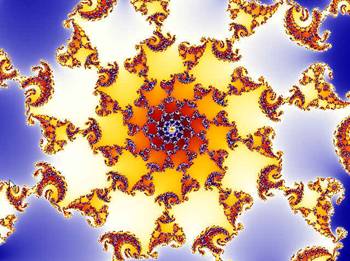
⑭ Fractal 작업 창으로 돌아와서 Gradient 편집 창을 열고 우측 마우스 클릭하고- Paste 선택
그러면 “Phoenix 1” Image가 아래와 비슷하게 될 것 이다.
⑮ 지금까지의 작업을 다음 두 가지 File로 저장 한다.
File- Save Parameters 선택 (File 이름= Phoenix Julia 1)
File- Save 선택 (File 이름= Phoenix Julia 1)
-- 계속 --
울트라프랙탈 한글 설명서 no2 : http://www.cgtool.com/xe/15382
.
Facebook 댓글
29
2009-Oct
가장대표적인 프랙탈 프로그램많은 프랙탈아티스들이 애용(?) 하고 있는 대표적인 프로그램입니다.
Ultra Fractal - 울트라프랙탈(www.ultrafractal.com)

울트라 프랙탈 5
Download Ultra Fractal 5.03 Standard Edition (6283 KB)
울트라 프랙탈 애니메이션 버전 5
Download Ultra Fractal 5.03 Animation Edition (6360 KB)
------------------------------------------------------------------------------------------------------------

Freeware editor for Windows 프리웨어 이기 때문에 마음대로 사용해도 됩니다.
Apophysis 2.02
Apophysis206_3Dhack.exe
프랙탈 만드는 대표적인 프로그램중 하나입니다.
멋진 작품 만들어 보세요~
---------------------------------------------------------------------------------------------------------------
Facebook 댓글